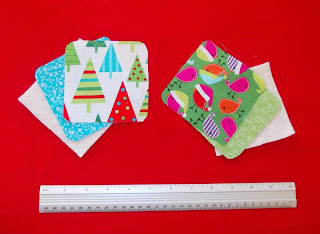
Okay, its October I know and maybe a bit early to be thinking about Christmas placemats and coasters but I really want to be prepared this year. Last year my sister came to stay with us over the Christmas break and found herself wrapping up my old, tatty placemats with left over Christmas paper as I'd not been able to find new ones I liked or I was prepared to pay the extortionate cost of just because they were "Holiday" themed.
I came up with a very simple idea for my placemats, partly because I'm new to the whole quilting business and also because I liked my Christmas fabric so much I really didn't want to start cutting it up and piecing it together again.
This is what I came up with from the lovely fat quarters I bought (above).
Firstly I used my old placemats and coasters as templates to cut out my fabric (seemed easier than having to measure and draw!). I cut out coordinating fabric for the backs and cotton batting too.
I layered the pieces up carefully because when I made a pencil case for my eldest daughter in August I didn't think about the order of things and ended up with the batting on the outside instead of between my fabrics - yes I'm that silly!
Next came the sewing; just a simple stitch close to the edge of my fabric. I didn't want a big bulky seam. I'm loving my walking foot too. It makes thick layers of fabric a breeze to sew over.
I chose two matching threads for the actual quilting part. I recently purchased a lot of different coloured variegated thread so I was itching to use it. My actual quilting skills aren't very good and I wasn't able to buy any dressmakers chalk in town so opted for a normal chalk stick and a ruler. By placemat number three I was starting to improve though - thankfully!
And here are the end results! I made 6 placemats and 8 coasters. I didn't quilt the coasters as I didn't think they needed it.
Here are the fronts and backs of the placemats so I guess technically I could use the flip sides for everyday if I wanted to, making them more multipurpose.
And finally the coasters. Hopefully they will last us a few years yet. All in all they were fun and simple to make and I learned so much making these.
I'm thinking of using some of my left over material to make some Christmas cushion covers. Those fat quarters sure go a long way on small projects so it will be interesting to see what other ideas I can come up with :-)
Life can be a furious leap from one day to the next and weeks soon roll into years. Take time, relax, create and let your mind untangle....
Saturday 19 October 2013
Thursday 10 October 2013
Lengthening Girls Jeans
Years ago when my eldest daughter was a little tot I bought her a pair of jeans. They were ridiculously cheap, just £2 and I embellished them with an iron on Hello Kitty patch. Years later and her little sister has been wearing them. They've washed and worn well all these years! Only problem was the fact they were getting just a tad too short for her but still fit perfectly in the waist. I didn't want to give up on those bargain jeans just yet so I decided to add a little crochet border to the bottom.
First of all I did blanket stitch by hand around the edges of the trouser bottoms using some strong thread so I would have something to start my crochet edge with. I had some remnants of DK bamboo cotton yarn so I decided to use this for the actual crochet part.
Using a 3mm hook, I did a round double crochet (single US) of blue through the blanket stitch loops then two more rounds of double crochet in cream and pink before doing another in blue. I then did little fans by missing a stitch, doing 5 treble crochet stitches into the next, missing a stitch then slip stitching into the next stitch all the way around for the edge. My little girl was absolutely delighted with them when she saw them this morning and insisted on wearing them today :-)
Obviously to increase the length it would be easy to just do a few more rounds before doing the final round of fan stitches. I think I will definitely be doing this again.
Subscribe to:
Posts (Atom)


