Thursday, 30 June 2011

Upcycled Baby Dress

I had a rather large top I wore last year whilst I was expecting my youngest daughter so I decided to turn it into a dress for her.  I didn't have a pattern so I just took one of her bought dresses so I could work out the correct shape for the top then decided I would have little tabs with buttons on the shoulders for ease of putting it on and taking it off.  I made the buttonholes by hand.  My sewing machine is quite basic and although it can make buttonholes its not a one step process and after unpicking the mess I made twice I didn't want to risk ruining the dress!

I used an old t-shirt for lining the top part of the dress and then added a gathered skirt, enclosing all the rough edges.  I used the ties that were originally attached to the back neck edge of the dress at the sides so I could cinch it in at my little girls waist and cut the skirt along the original bottom of the top so I wouldn't have to hem it.  I think the size is roughly 6-12 months.

Now all we need is a bit of sunny weather so she can sport her new dress!


Here are just a few of the pictures I took along the way. Unfortunately I forgot to take a picture of the top before I chopped it up!
Gathering the skirt ready to attach to the top.

I attached it to the lining part first then top stitched the front of the top over the gathered bottom to enclose all the rough edges.  It was fiddly but well worth it.

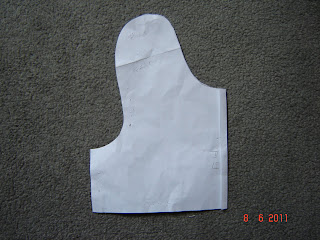
The pattern I made for the top.

The crease is where I folded it over to cut the front of the dress. I later rounded the corners of the front as I thought it looked a bit odd square.

I must say I'm rather pleased with the results, especially as its the first time I've made my own pattern.

Crochet Blanket

I started this blanket about a year ago. Now you would be forgiven for thinking it must be a lovely big blanket then after a year but alas, no.  It started with the first granny square I ever completed then I did quite a few of them all in different colours and ended up shoving them all in a bag at the back of a wardrobe.  I decided it was a bit of a shame leaving them there so I finally joined them all together and gave them a border.


I got the pattern for the squares from a very old Patons crochet booklet circa 1970's.  It used to belong to my mother-in-law who gave it to me a few years ago.  I think if I make another blanket then I will certainly make bigger squares, these ones only measured 4" square and it was a bit tedious joining them together.

My girls certainly love this little blanket anyway and it will be a good one to throw in the basket under the buggy to take on walks and something to sit on if we pop into the park and rest a while.

Monday, 20 June 2011

Super Easy Toddler Slippers

I wrote this pattern 2 years ago, I can't believe its been that long!  It appears on an old blog of mine which I got out of the habit of updating so I decided to put the pattern here to share too, for personal use only.


I’ve knit these slippers to fit my 2 ½ year old girl whose feet measure 6” from toe to heel.  They are easy to adjust by either increasing or decreasing the amount of rows in the first part of the pattern or the second part after the initial decreases.  As it is they are roomy which will allow for some growth.  They are worked in one piece with the top section once sewn up consisting of a moss stitch panel and the sides and sole in stocking stitch.


Materials
7mm Straight Needles
50g DK Yarn (Held double)
Darning Needle
Optional – anti-slip matting to sew ovals on heel and toe area

Pattern (Knit Two)
Holding yarn double, cast on 22 stitches.

Work the following pattern for 12 rows.
1)    K1, P1, K1,P1, K14, P1, K1, P1, K1
2)    K1, P1, K1, P16, K1, P1, K1
Decrease as follows:
1)    K1, P1, K1,P1, SSK,  K10, K2 tog, P1, K1, P1, K1
2)    K1, P1, K1, P14, K1, P1, K1
3)    K1, P1, K1,P1, SSK,  K8, K2 tog, P1, K1, P1, K1
4)    K1, P1, K1, P12, K1, P1, K1
Continue in pattern as follows:
1)    K1, P1, K1,P1,  K10, P1, K1, P1, K1
2)    K1, P1, K1, P12, K1, P1, K1
Repeat above 2 rows once more.

Decrease for Toe
1)    K1, P1, K1,P1, SSK,  K6, K2 tog, P1, K1, P1, K1
2)    K1, P1, K1, P10, K1, P1, K1
3)    K1, P1, K1,P1, SSK,  K4, K2 tog, P1, K1, P1, K1
4)    K1, P1, K1, P8, K1, P1, K1

Break off yarn, thread through remaining stitches and pull tight.
Fold in half lengthways from toe to heel then sew up back seam, leaving the moss stitch area open.
Sew up front from toe for around 3 inches.

I sewed 2 little pads on the bottom of each slipper cut in ovals from anti-slip matting as we have wooden floors and this has improved the grip.

Monday, 6 June 2011

Bike Fest

Its Bank Holiday weekend here in Ireland and very local to us is Ireland Bike Fest.  The weather soon cleared from overcast to bright and sunny too and we drank in the atmosphere of live music, friendly people and of course all the wonderful bikes!  What a fabulous time we had! Husband was in his element surrounded by bikes along with big daughter who wanted to have a go. Little daughter just enjoyed the ride in her pram. And of course the day would not be complete without burgers, hotdogs and a very large 99 flake icecream for big daughter.


Saturday, 4 June 2011

Shopping

Ah today was a good day to go shopping, so warm and for a change in Ireland, not raining.  We live in a little tourist town and this weekend is bank holiday weekend so town was humming with life! My first port of call was a new shop in town full of lovely gifts where I bought two cute sheep and a lovely felt purse. My next stop was at The Crafty Alley for some sewing supplies and I came away with a few metres of gorgeous fabric and a few bits and bobs to go with it.  I'm rather excited at the thought of making some clothes for my girls as I've been inspired by some of the beautiful makes reading other blogs on the web.


Pictures to follow!