Friday, 20 December 2013

New Hat

After searching high and low for one of the many hats I've made myself over the years I came up empty handed so decided I needed to make a new one.

I chose a pretty pattern from issue 11 of Simply Crochet magazine, using Tivoli Aran superwash wool.  I used a 5mm hook though instead of a 4.5mm hook as I tend to crochet a little on the tight side - well either that or I have a big head!  I also did 3 rounds of half trebles instead of double crochets as I wanted a slightly wider brim.

It fits beautifully and does the job of keeping my head warm now the weather's finally become colder.  As normal it's another shoddy photo as its just so dark and dismal here still!

Thursday, 19 December 2013

Full of Busy

I'm not exactly sure where the past month went - it's just flown by!  What's more there were only 16 photos taken on my camera too...  The picture above is of the lovely sunrise I witnessed last week.  A few minutes later it had disappeared.  We've been getting quite violent weather just lately with red weather warnings issued for our part of the country.  This morning we woke up to frost/snow on the mountains but the view was soon obscured by the clouds rolling down over them.
One of the things I did manage to take a picture of was the little Christmas gifts I made for my eldest daughter's teachers.  I followed a wonderful tutorial on Attic24 and soon had a little production line going to produce these.  Unfortunately due to bad weather conditions the photos are not their best as light has been a problem.  I'm happy to say the gifts have been well received.

I guess one of the reasons for the month going so quickly, and the lack of photographic evidence for the passage of time is because I've been full on writing and editing.  I want to release my first book once I've worked out how to turn it into an eBook, closely followed by the sequel.  There's still an awful lot of editing to do though...

And finally we are still trying to get ready for Christmas here.  The tree is up, although there are baubles on the floor daily as the girls keep messing with them, most of the presents have been bought and delivered and there are just a few more food items we need for Christmas day.

Have a very merry Christmas everyone & a prosperous New Year!

Wednesday, 6 November 2013

Simple Yo-Yo Christmas Ornament

I'm new to yo-yo making.  I've seen them around the internet being used for many different projects and thought, hmmm now wouldn't one of those make a simple Christmas ornament.  So here's what I came up with!  (Please excuse the dodgy photos - the light as usual is awful here!).


First up I cut out a circle - I think it was roughly 10cm in size, I used a bowl to draw around.


Then I folded over the edge and did a simple running stitch - all normal yo-yo making stuff so far!


Now its getting ever so slightly exciting!  I popped a bit of stuffing into the centre :-)


Then I pulled on the cotton to draw up the thread, making a lightly stuffed yo-yo....


... Sewed on a button and bit of ribbon and voila!  A very simple hanging tree ornament!  So simple in fact its embarrassing.  Ah well sometimes the best ideas are the easiest ones ;-)


Saturday, 19 October 2013

Christmas Placemats & Coasters

Okay, its October I know and maybe a bit early to be thinking about Christmas placemats and coasters but I really want to be prepared this year.  Last year my sister came to stay with us over the Christmas break and found herself wrapping up my old, tatty placemats with left over Christmas paper as I'd not been able to find new ones I liked or I was prepared to pay the extortionate cost of just because they were "Holiday" themed.

I came up with a very simple idea for my placemats, partly because I'm new to the whole quilting business and also because I liked my Christmas fabric so much I really didn't want to start cutting it up and piecing it together again.


This is what I came up with from the lovely fat quarters I bought (above).


Firstly I used my old placemats and coasters as templates to cut out my fabric (seemed easier than having to measure and draw!).  I cut out coordinating fabric for the backs and cotton batting too.

I layered the pieces up carefully because when I made a pencil case for my eldest daughter in August I didn't think about the order of things and ended up with the batting on the outside instead of between my fabrics - yes I'm that silly!


Next came the sewing; just a simple stitch close to the edge of my fabric.  I didn't want a big bulky seam.  I'm loving my walking foot too.  It makes thick layers of fabric a breeze to sew over.

I chose two matching threads for the actual quilting part.  I recently purchased a lot of different coloured variegated thread so I was itching to use it.  My actual quilting skills aren't very good and I wasn't able to buy any dressmakers chalk in town so opted for a normal chalk stick and a ruler.  By placemat number three I was starting to improve though - thankfully!

And here are the end results!  I made 6 placemats and 8 coasters.  I didn't quilt the coasters as I didn't think they needed it.

Here are the fronts and backs of the placemats so I guess technically I could use the flip sides for everyday if I wanted to, making them more multipurpose.

And finally the coasters.  Hopefully they will last us a few years yet.  All in all they were fun and simple to make and I learned so much making these.

I'm thinking of using some of my left over material to make some Christmas cushion covers.  Those fat quarters sure go a long way on small projects so it will be interesting to see what other ideas I can come up with :-)


Thursday, 10 October 2013

Lengthening Girls Jeans

Years ago when my eldest daughter was a little tot I bought her a pair of jeans.  They were ridiculously cheap, just £2 and I embellished them with an iron on Hello Kitty patch.  Years later and her little sister has been wearing them.  They've washed and worn well all these years!  Only problem was the fact they were getting just a tad too short for her but still fit perfectly in the waist.  I didn't want to give up on those bargain jeans just yet so I decided to add a little crochet border to the bottom.

First of all I did blanket stitch by hand around the edges of the trouser bottoms using some strong thread so I would have something to start my crochet edge with.  I had some remnants of DK bamboo cotton yarn so I decided to use this for the actual crochet part.
Using a 3mm hook, I did a round double crochet (single US) of blue through the blanket stitch loops then two more rounds of double crochet in cream and pink before doing another in blue.  I then did little fans by missing a stitch, doing 5 treble crochet stitches into the next, missing a stitch then slip stitching into the next stitch all the way around for the edge.  My little girl was absolutely delighted with them when she saw them this morning and insisted on wearing them today :-)

Obviously to increase the length it would be easy to just do a few more rounds before doing the final round of fan stitches.  I think I will definitely be doing this again.

Monday, 16 September 2013

So Long Ago!

Its been a long time since I updated, I know!  You know when you keep meaning too, and then you keep putting it off and before you know it the whole of summer has flown by (plus some of spring) and you're into Autumn!

Well I have been busy at least.  I've just finished the above quilt for my youngest daughter, using the farmyard panels which were in a cot runner which was due to become redundant.  It's a first for me, complete with wonky lines but I'm proud of it.

I also made this Anya blanket (found on Ravelry) over the summer holidays.  I'd like to re-do it in one colour or perhaps a subtle variegated yarn.

I was treated to some fabric - an early birthday pressie and I'm still deciding what to make although I've already incorporated some of the cupcake material into my eldest daughters blanket (still being made).
I also bought a kit from The Sewing Shed and made this lovely bag which is great for carting my crochet out and about.
 I embellished a plain cardigan with some crochet flowers for my eldest daughter....
 And made quite a few cushions for our caravan :-)

And finally I hooked up Toothless from How to Train Your Dragon.  Love the film and just had to have my own Toothless!  I bought the pattern from Etsy - here's the link.

That's not all I've been up to but a snap shot.  Hopefully it won't be so long before I update my blog again!

Monday, 22 April 2013

Amineko Cats

I bought a wonderful book called Hello My name is Amineko by Nekoyama.  It's a very delightful book full of Amineko's adventures and of course there is a pattern to make the cat plus accessories.

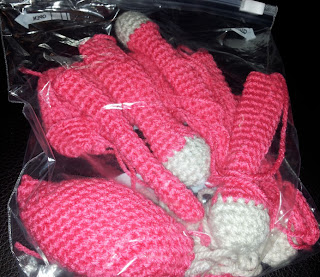
 Below is a bag of body parts all ready for stuffing and sewing up!  The pattern is very simple to follow.  I used a 3mm hook with DK weight yarn so the stitches would be nice and tight.  I didn't want any stuffing to show through.
The first cat I made was for my fella who requested a rainbow coloured cat so I gave this kitty a stripey effect t-shirt.

Once I made the first one I had to work on two at the same time as both my girls wanted a cat too.  The eldest is all pink and the youngest loves blue so they chose the colours themselves.

I had a lot of fun making these and then putting them into poses afterwards.  The book is full of ideas for different poses too.  I am currently working on a red coloured Amineko for my sister :-)

Wednesday, 20 March 2013

March so far....


So far March has been another busy month in the TMC household and the weather has been so changeable too!  Lashings of rain, sleet and snow, the occasional frost and even sunshine!

I've made more squares for the Let's Knit charity blanket the forum members are taking part in.  The deadline for sending in the squares is this Friday and then they will all be made up into blankets and auctioned off for two different charities.
For Mother's Day on 10th of March I made a daffodil brooch for my mother-in-law from a wonderful tutorial by Lucy at Attic24.
This heart also came from a link on her website.  I made this for my own mum, adding a frilly edge.

Below is a snapshot of the St Patrick's day parade through town in which we took part.  Eldest daughter marched with her Irish dancing school and we joined in too.  Its such a lovely atmosphere with everyone lining the route waving and cheering.

I made this bunny rabbit for my sister who wants to give it as a present to a little baby girl due in May.  I started off with a basic pattern then changed it quite a lot to fit in with what I wanted.  The dress I made up as I went along.
This is the lovely 'house' built by my 2 year old daughter with a little help from me.  She loves building towers and buildings out of her Duplo Lego!
And finally an experimental lower in sugar and fat flapjack mixture.  Looks tasty but I wasn't overly impressed with it.  Mind you it was soon wolfed down by everyone :-)

Tuesday, 19 February 2013

Full On February

Life has been rather hectic here since the end of January.  Mr TMC has had a lot of upheaval at work meaning we've hardly seen him for the past 3 weeks.  Of course when he was away life sent a few little annoyances like the car breaking down and the baby monitor breaking too!  Oh and sick children, mustn't forget the sick children.  There are so many illnesses going around at school right now and they're finding their way to our house...

Anyway I've certainly kept myself busy during this time and in no particular order (because I still haven't figured out how to put my pictures in a particular order) this is what I've been doing...

First up is a dolls/teddy blanket, complete with a little 2 year old arm creeping into the shot for scale.
While Mr TMC was away I decided to surprise him by building the flat pack chest of drawers which had been sitting around in its box for a while.  I knew he wouldn't have time to build them.  I felt faint when I saw the sheer number of parts and the very tiny picture only construction leaflet!  The build needless to say wasn't without its problems...
Here is the 2nd dolls/teddy blanket I made.  It's just slightly smaller than the first.  I made one each for my girls who have an abundance of baby dolls and teddies.
This was my attempt at working out where to put the squares.  I thought if I took a picture it would help with the placement once I started hooking them together.
I hooked up this little chick last night.  My eldest daughter came out of school with her normal 11th hour request of making something to take into school tomorrow.  The pattern is by Heather Casavant at snoodlestudio.etsy.com.
I've also been experimenting with mug hugs and mug rugs.  This one I made for my own mug although it is a bit high as my lips touch the wool!
I made another 4 squares for the charity blanket for Crafts Beautiful/Lets Knit.  The response from the forum members has been fantastic with loads of squares already made and sent off to be hooked together :-)
This set of mug hug and mug rug (complete with spotty mug) went to my eldest daughter's teacher who was leaving due to the usual teacher returning from maternity leave.  She was such a lovely teacher and I was sorry to see her go.
Yet another mug hug, this time for Mr TMC for Valentine's Day for his very tall mug. 
And I finally finished the shamrocks and thistles for my friend's wedding.  This is a small selection of those made as there were 32 of each.
And finally a very tiny blanket.  I was inspired by the mini granny squares on Attic24's blog but my sewing together skills were, well quite frankly awful!  I managed to put 12 together before I decided to call it a day and made it into a very tiny blanket, probably suitable for Barbie.

Hopefully I won't leave it so long before I next update my blog and hopefully I will find my misplaced camera too as I had to take a lot of these pictures on my iPad.  I have quite a few WIP's I need to finish and projects I either want to continue with or start.  Oh and of course 2 extra chicks for my girls :-)